GAN代码的搭建(2)
在上一篇文章已经介紹了处理mnist数据集和如何送入GAN中训练,但是GAN的网络框架还没搭,本文将一起来把GAN的网络框架搭起来。
传统GAN中关键的网络是判别器D和生成器G,这两个网络一旦建立,整个框架将会很清晰。我们先来搭建G网络,回顾一下生成器G的作用。生成器的作用就是 输入噪声经过网络后生成可以以假乱真的数据。今天我们要实现的就是让G网络生成mnist的手写数据图片。在正式搭建网络之前,我们要先掌握一些机器学习 中的基础知识,如果你一点概念都没有就移步到其它网站去好好学学一下这些基础知识。
G网络的搭建
让低维噪声到高维图片,我们合理的操作除了对数据做reshape还要结合卷积神经网络dconv,加入深层卷积网络可以让生成的图片更加的合理。所以CNN卷 积神经网络我们需要掌握,我也会出一篇文章详细介绍一下CNN。batch normalize是对数据做批规范化为了防止“梯度弥散”,这个在神经网络中的应用还 是很重要的。激活函数的选择也是很重要的,在生成网络G中对数据处理的激活函数我参考了infoGAN的网络选用的是relu激活函数。我也会出一篇博客专门 说说激活函数。这些基础知识如果你都知道的话就可以正式搭建网络了,我先把上述的网络包装一下。
#本函数在于处理batch normalize,可精简化代码
def bn(x, is_training, scope):
    return tf.contrib.layers.batch_norm(x,
                                        decay=0.9,
                                        updates_collections=None,
                                        epsilon=1e-5,
                                        scale=True,
                                        is_training=is_training,
                                        scope=scope)

#本函数在于卷积网络的deconv
def deconv2d(input_, output_shape, k_h=5, k_w=5, d_h=2, d_w=2, name="deconv2d",
             stddev=0.02, with_w=False):
    with tf.variable_scope(name):
        # filter : [height, width, output_channels, in_channels]
        w = tf.get_variable('w', [k_h, k_w, output_shape[-1], input_.get_shape()[-1]],
                            initializer=tf.random_normal_initializer(stddev=stddev))

        try:
            deconv = tf.nn.conv2d_transpose(input_, w, output_shape=output_shape,
                                            strides=[1, d_h, d_w, 1])

        # Support for verisons of TensorFlow before 0.7.0
        except AttributeError:
            deconv = tf.nn.deconv2d(input_, w, output_shape=output_shape,
                                    strides=[1, d_h, d_w, 1])

        biases = tf.get_variable('biases', [output_shape[-1]],
                                 initializer=tf.constant_initializer(0.0))
        deconv = tf.reshape(tf.nn.bias_add(deconv, biases), deconv.get_shape())

        if with_w:
            return deconv, w, biases
        else:
            return deconv

#本函数在于对数据做形状上的改变,只是在线性条件下完成的
def linear(input_, output_size, scope=None, stddev=0.02, bias_start=0.0, with_w=False):
    shape = input_.get_shape().as_list()

    with tf.variable_scope(scope or "Linear"):
        matrix = tf.get_variable("Matrix", [shape[1], output_size], tf.float32,
                                 tf.random_normal_initializer(stddev=stddev))
        bias = tf.get_variable("bias", [output_size],
        initializer=tf.constant_initializer(bias_start))
        if with_w:
            return tf.matmul(input_, matrix) + bias, matrix, bias
        else:
            return tf.matmul(input_, matrix) + bias
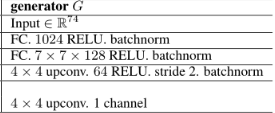
有了上述的网络包装,我们在搭建生成器G将会方便很多。我们先来看看我们的网络的结构:

我们就正式来看看这个G网络的实现代码,其实很简单。
# 送入生成器的输入噪声z为(64,62)
def generator(self, z, is_training=True, reuse=False):
    with tf.variable_scope("generator", reuse=reuse):
        net = tf.nn.relu(bn(linear(z, 1024, scope='g_fc1'),
                         is_training=is_training, scope='g_bn1'))
        net = tf.nn.relu(bn(linear(net, 128 * 7 * 7, scope='g_fc2'),
                         is_training=is_training, scope='g_bn2'))
        net = tf.reshape(net, [self.batch_size, 7, 7, 128])
        net = tf.nn.relu(
                         bn(deconv2d(net, [self.batch_size, 14, 14, 64], 4, 4, 2, 2,
                         name='g_dc3'),is_training=is_training,scope='g_bn3'))
        out = tf.nn.sigmoid(deconv2d(net, [self.batch_size, 28, 28, 1], 4, 4, 2, 2,
                            name='g_dc4'))
        return out
D网络的搭建
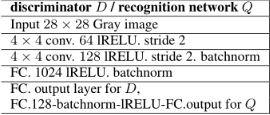
噪声经过生成器G后就会输出[64,28,28,1]的一批图片,这批图片是fake的,所以要送入判别器D中去判断真假,我们先看看判别器在mnist数据集下的网 络结构。

我们也要对其中的一些要求包装一下,这里说一下MinibatchLayer是为了缓解GAN训练时候的collapse mode
#本函数在于卷积网络的conv
def conv2d(input_, output_dim, k_h=5, k_w=5, d_h=2, d_w=2, stddev=0.02, name="conv2d"):
    with tf.variable_scope(name):
        #input_.get_shape()[-1]返回输入的图像通道数,mnist的图像通道数为1,w记录的是filter
        w = tf.get_variable('w', [k_h, k_w, input_.get_shape()[-1], output_dim],
                            initializer=tf.truncated_normal_initializer(stddev=stddev))
        #此处可以参考DCGAN,filter加上步长处理
        conv = tf.nn.conv2d(input_, w, strides=[1, d_h, d_w, 1], padding='SAME')
        #将conv加上偏值处理
        biases = tf.get_variable('biases', [output_dim],
                                 initializer=tf.constant_initializer(0.0))
        conv = tf.reshape(tf.nn.bias_add(conv, biases), conv.get_shape())

        return conv

#本函数在激活函数的设计上有别于单纯的relu,在小于0的部分用了减小比例的处理,比较像ELU
def lrelu(x, leak=0.2, name="lrelu"):
    return tf.maximum(x, leak*x)

def MinibatchLayer(dim_b, dim_c, inputs, name):
    # input: batch_size, n_in
    # M: batch_size, dim_b, dim_c
    m = linear(inputs, dim_b * dim_c, scope=name)
    m = tf.reshape(m, [-1, dim_b, dim_c])
    # c: batch_size, batch_size, dim_b
    c = tf.abs(tf.expand_dims(m, 0) - tf.expand_dims(m, 1))
    c = tf.reduce_sum(c, reduction_indices=[3])
    c = tf.exp(-c)
    # o: batch_size, dim_b
    o = tf.reduce_mean(c, reduction_indices=[1])
    o -= 1  # to account for the zero L1 distance of each example with itself
    # result: batch_size, n_in+dim_b
    return tf.concat([o, inputs], axis=1)
我们来看看判别器D的网络实现
#送入鉴别器的输入为(64,28,28,1)
def discriminator(self, x, is_training=True, reuse=False):
    with tf.variable_scope("discriminator", reuse=reuse):
        # 经过这一步卷积后,(64,28,28,1)-->(64,14,14,64) 具体的计算为(28-2)/2+1
        net = lrelu(conv2d(x, 64, 4, 4, 2, 2, name='d_conv1'))
        net = lrelu(
        bn(conv2d(net, 128, 4, 4, 2, 2, name='d_conv2'),
                  is_training=is_training, scope='d_bn2'))
        net = tf.reshape(net, [self.batch_size, -1])
        net = MinibatchLayer(32, 32, net, 'd_fc3')
        net = lrelu(bn(linear(net, 1024, scope='d_fc4'),
                    is_training=is_training, scope='d_bn4'))
        out_logit = linear(net, 1, scope='d_fc5')
        out = tf.nn.sigmoid(out_logit)

    return out, out_logit, net
判别器的输出在sigmoid作用下归一到(0,1)之间,返回一个概率值,用于判断数据的真假,具体的分析我们在下次的损失函数的设计代码那一节再说。
OK,到这里GAN的生成器和判别器的网络算是搭完了,接下来就是对网络的训练了。还有一个很重要的问题就是训练过程中的损失函数的设计和实现,这一部 分我们在下次再说。
我的GANs的完整代码:
大家感觉可以就在github项目上点一下关注,哈哈
谢谢观看,希望对您有所帮助,欢迎指正错误,欢迎一起讨论!!!


